Friday, October 5, 2018

6 ways to get the most out of your stand ups.


My first experience of scrum came back in 2006. I was excited about working in a cool new way. Sprints, Backlog, sprint planning, stand-ups, demos were the words making the rounds.

Yet it took little time for all of it to turn into a monotonous process. Quite the antithesis of what it was envisioned to be.

Stand-ups, in particular, tend to become status update sessions rather than collaboration forums.
You can visibly see the problem when developers are facing the manager when they speak.

Even when there is some semblance of collaboration, the templated approach "what I did yesterday, What I will do today?" kills it. There is a lack of vision and slowly the whole thing becomes a chore.

The stand up no longer serves its purpose and instead becomes a micromanagement platform. The fact that most scrum masters are Project Managers does not help as they can't help but ask for status.


The Problems:
  • Micromanaged status updates 
  • a boring template approach
  • Lack of direction.
It is not uncommon to see a stand up with some disinterested participants, some looking to score points and still, others going on about "What they did?" without considering the "How is this helpful?" aspect of their update.


While there is no single remedy that can fix this 100% percent a few measures can help improve the situation significantly.

1Mr. Master Know your role: As a scrum master if you are actively participating in the stand-up; day in day out then know this: "You are a very large part of the problem". The stand-up is a meeting for the team, of the team, by the team. A place and time to assess whether the sprint is on target and if required enlist the scrum master's help to eradicate obstacles. If the scrum master is doing their job well, then they are essentially not required to speak in the stand-up. It is critical that a scrum master own the role and shed their status changing Project Manager skin.


2. A Stand-up mission: it is vital that the sprint goal is established when planning and serve as the mission for the stand-up. Most training guides tell us that stand up is about discussing your current state of affairs through ("What did I do", "What Will I do", "What are my obstacles"). What needs to be established and ingrained is; why are we doing this? The stand-up template most prescribed focuses on the what and how instead of, the why.

3. "Your stand up your template":  Let the team members decide how they want to conduct their stand up. As long as the stand up serves its purpose of "allowing the team to inspect, adapt and course correct daily". Allowing the team to decide how they do stand up, will empower the team members, make them feel engaged and allow them to create a stand up that is efficient and enjoyable.  Be it totems, tv screens projecting JIRA boards,  or chairs turned around at desks; they all work if the team believes in the process & follows it religiously.

4. Punctuality, tools & precision: A stand up must begin at the same time every day; must be attended by all healthy team members. The respect for the stand up is essentially respect for your colleagues and their time. Making use of the JIRA scrum boards and burndown charts can keep stand up time down. If the board is updated "everyone already knows what you did yesterday?". The aim should be to keep the information shared with your teammates precise and succinct. Verbose updates can lead to wandering minds and kill interest.

5. Horses for courses: To start with, get the right people. Look for self-motivated, assertive team members who are hungry to learn. At least a couple of team members who are ideators when it comes to processes and who are passionate about improvising and tailoring processes to meet the team's needs. Their positive energy and contribution can rub off on others in the team and create just the right environment for the process to organically move in the right direction.

6. A right mix of experience: A combination of senior and junior resources is a must. Generation after generation people grow up with ever-changing technology (in terms of tech, a generation for me is about 5 years) and the younger techies are generally more in touch with the ever-changing tech landscape. Moreover, I am a firm believer that radical innovation flows bottom-up from the junior most to the senior most. On the other hand, senior team members can bring in years of experience in taking ideas from inception to fruition. They know the common pitfalls and can guide the team through change.

While it's not easy to fix the two points above if you inherit a team (as a lead/team member/scrum master); you can definitely make course correction overtime to get the right balance.

Above all, it is important for the team members to own the stand-up; to believe in its use and ability to make a difference in their productivity and have fun "standing up". The stand up is a key cog in the "inspect and adapt" machine and getting it right is imperative.

These steps have helped me improve stand-ups (albeit not with total success). Here's hoping they can serve you well too.

Friday, February 23, 2018

Using AWS DMS for LIVE migrating databases across accounts.


Last year we had to deal with a not so common problem. We had to migrate our MySQL RDS instances from one AWS account to another.


We were pointed in the direction of DMS (Data Migration Service), Amazon's data migration service to achieve exactly this. We used the service; migrated the database to our new account and everyone lived happily ever after. 😉


Except nothing worth achieving is ever so easy; and while DMS is an incredible tool there are a few more things you will be required to do; especially if you do not want any down time.


Setting up DMS (If you are familiar with DMS or more interested in LIVE MIGRATION skip to here.)


This is easy enough. You will first need to setup a VPC peering between VPCs in the two AWS accounts. Then go over to the DMS service and setup the following.

Setup Source & Destination end points.

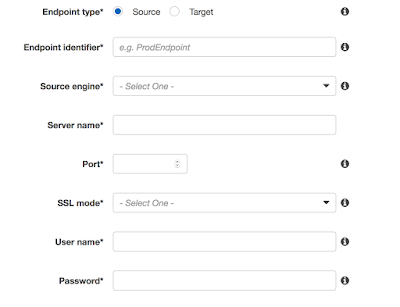
Use the simple form below and setup the source and destination endpoints.


  1. The endpoint type will allow you to create a source/target end point.
  2. The endpoint identifier is any unique easy to identify name for the endpoint. The engine 
  3. The engine is essentially the db provider (oracle, aurora, mysql, postgres etc) 
  4. Server name, port can be found from the RDS instance. 
  5. For SSL Mode just select none.
  6. Key in the username and password and we are done.

Create the replication instance

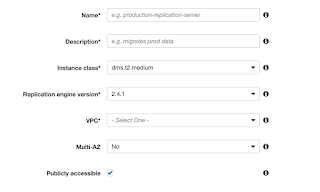
This is the heart of DMS. The replication instance runs on an EC2 and moves data from one database to another.


All fields are self explanatory. Use the appropriate instance (Class T or C) per your requirement. Also ensure to put in the right amount of Allocated Storage in the advanced option.
Use the replication instance to test connections to The source and target databases.

Create Replication Task

Create a replication task by using an appropriate task name, and selecting the source/target endpoints and replication instance. Depending on your need select the migration type. For cross account replication we went with "Migrate Existing data and replicate ongoing changes".

Select the drop target table option to begin afresh every time you start the task. Select Max LOB size and use advanced options to fine tune the job if required.

Run the replication Task

Select the replication task and click start. If your setup is correct the job should migrate data across to the new database. Any changes you make data in the sour ce database will (almost immediately) move to the new database. You may run into small issues related to your specific database (ex: binlog_format should be set to ROW for mysql database). But these are usually easily resolved.


DMS Works but Target DB is a dud

At this point DMS has done its job. It has successfully moved data across to the target database. In the process though it removes all foreign keys, indexes (AUTO_INCREMENTS for mysql) and retains only the core data and primary key declarations.

Having inherited a database made long ago, not all scripts were available neither could we guarantee that the scripts that were available we indeed the latest scripts.

We used the system tables in the source database to gather information about indexes, auto_increments (in case of mysql), foreign keys and created our own information tables over in the target database. Once the indexes and foreign keys are created the database is nearly ready. All you need is set the value of auto_increment/sequence in the database.
 
Live Migration (NO DOWN TIME)

Keeping DMS running means that transactions are migrated to the new database. But to perform live migration you need to do a small trick.

Estimate the time it will take you to, server by server application by application, move your system over to the new database while it functions (of course behind the load balancer). Analyze and estimate the number of transactions that your most OLTP heavy table will see in this duration. Use that number to increase the value of the sequences sufficiently.

Example: If you believe that you will be able to migrate applications to new db in about an hour and your order table roughly receives 1000 orders per hour; increase the value of AUTO_INCREMENT (MySQL) , Sequence (Oracle) by about 1100 or so.

Once this is done, you can safely point your applications to both the old and new database and avoid PRIMARY KEY clashes. New rows inserted in the new database will have primary keys values much larger than those of rows inserted in the old database (which are being migrated over by DMS).

With this setup, you can now begin to migrate load balanced applications over to the new database safely.


Few key things that you will need to be mindful of:
  1. Study and know your applications/modules well. Ensure you migrate them in proper order. If Module 1 creates data that is then read by Module 2; make sure you move Module 2 before Module 1. Doing this the other way round may lead to unexpected issues. Module 1 will create a row in the new database, but since data does not get migrated backwards Modules two will not find the data in the old database.
  2. Use a 3rd RDS instance (served by DMS from the 2nd ) to ensure you have a database with both old DB and new data DB in case you need to roll back. 
  3. Try and perform this operation during relatively off peak hours. 
  4. Conduct numerous trials in sandbox environment. As many as you need.
HAPPY MIGRATING !!

Wednesday, January 6, 2016

Exposing a Web Service using JAX-WS

We are going to look at a short (and completely useless from a production standpoint) example of exposing a web service using JAX-WS.

We will create a simple method to get a Single Employee data. You can then build from there to further enhance the functionality.

We are not going to look into deploying this web service on a web server. That is for a separate post. 

Lets Dive in:

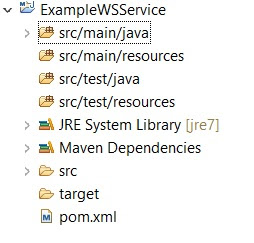
We will first create a simple maven project in eclipse: ExampleWSService


First add your maven dependency:


 <dependencies>
  <dependency>
   <groupId>javax.xml.ws</groupId>
   <artifactId>jaxws-api</artifactId>
   <version>2.2.6</version>
  </dependency>
 </dependencies>


Create a new interface EXWSService which will serve as our SEI (service endpoint interface). This is not a a necessary step but it is always good to specify your exposed methods in an interface and then have an implementation class for the business logic. 


package com.study.ws;

import javax.jws.WebMethod;
import javax.jws.WebResult;
import javax.jws.WebService;
import javax.jws.soap.SOAPBinding;
import javax.jws.soap.SOAPBinding.Style;
import javax.jws.soap.SOAPBinding.Use;
import javax.xml.ws.ResponseWrapper;

import com.study.ws.domain.Employee;

@WebService(name = "EXWSService")
@SOAPBinding(style = Style.DOCUMENT, use = Use.LITERAL)
public interface EXWSService {

@WebMethod(operationName = "getEmployee", action = "getEmployee")
@ResponseWrapper(className = "com.study.ws.jaxws.GetEmployeeResponse", partName = "WSEmployee")
@WebResult(name = "employee")
public Employee getEmployee();

}


Annotations:

  • @Webservice: Allows us to provide a name element and designates this interface as an end point. The name provided here will appear in the WSDL as the name of the PortType.
  • @SoapBinding: This annotation allows us to specify the message style and encoding. Based on whether we use DOCUMENT or RPC style the interpretation of some of the other annotations changes. We can also select the parameterStyle, which if set to BARE means that the method parameter is the entire body of the message and there is no wrapper element.
  • @WebMethod: This annotation is required on each service method that we are going to expose.  We can specify the operation name and soap action.
  • @ResponseWrapper: This is required if the style of SOAPBINDING is DOCUMENT. You may specify a fully qualified class name and a part name. If the style is RPC or if the parameterStyle is BARE along with style being DOCUMENT the wrapper need not be specified. 
  • @WebResult: You can specify the partName, name and whether the result is to be pulled from header.
We then provide an implementation class as follows:


package com.study.ws;

import javax.jws.WebService;

import com.study.ws.domain.Employee;

@WebService(endpointInterface = "com.study.ws.EXWSService", serviceName="EXWSServiceImpl", portName="EXWSServiceport")
public class EXWSServiceImpl implements EXWSService{

public Employee getEmployee() {
return new Employee(1L, "James", "Bond");
}

public EXWSServiceImpl() {
super();

}

}

Now compile your project. Go to the classes folder. In this folder (if you have used exactly the same names as in here) run the following command:

wsgen -cp . -keep -verbose com.study.ws.EXWSServiceImpl.

wsgen utility creates the request and response wrapper classes that are required with DOCUMENT style of SOAPBINDING. The @RequestWrapper and @ResponseWrapper allow you to specify the details of such generated cass. Even if these annotations are not provided default values are used and wrapper classes are generated. 

You should see output as below:


Add the generated classes to your source. If you view them you will see that they just wrap your request and response data.

Next create a publisher as follows:


package com.study.ws.publisher;

import javax.xml.ws.Endpoint;

import com.study.ws.EXWSServiceImpl;

public class Publisher {
public static void main(String[] args) {
Endpoint.publish("http://localhost:8090/EXWSServiceImpl", new EXWSServiceImpl());
}

}


Run it and type the following url in your browser:

http://localhost:8090/EXWSServiceImpl


The web service is now published and you may explore the generated WSDL. To understand the WSDL and relate its segments to java annotations have a look at the following article: